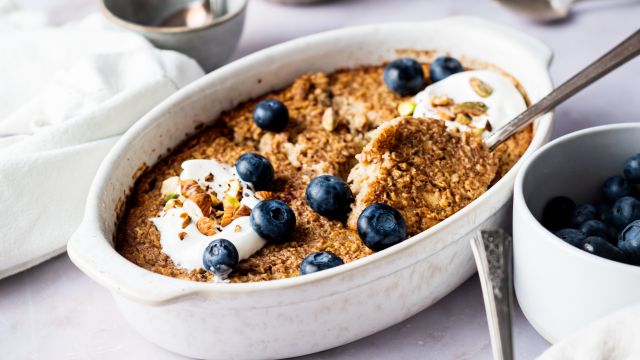
There is nothing better than baked oatmeal when it comes to make-ahead breakfasts. It's easy to make, takes minimal prep, and is tasty enough for busy mornings or a special occasion.
Oatmeal is a staple in our home, but we have one family member who wants nothing to do with any type of mushy oatmeal. That's where this Cinnamon Baked Oatmeal is perfect.
Baked oats have all the heart-healthy whole grains and fiber of oatmeal, but with a totally different, light texture. It's basically like a cross between a baked oat bar and bread pudding. It is still soft and moist, but it isn't gooey or mushy at all.
Plus this is the perfect recipe to make on the weekend and reheat for a quick breakfast during the week. My daughter loves it for breakfast, an afterschool treat, and even packed in her lunchbox. It's a must for busy parents looking for a make-ahead breakfast idea.
This recipe is also a favorite because it is so flexible. Although the version I am sharing has lots of cinnamon and banana as a natural sweetener, you could easily switch things up. Add fresh fruit, sprinkle on chocolate chips, add toasted nuts. The options are endless.
Looking for more easy oatmeal recipes? Try these Slow Cooker Steel Cut Oats, Baked Oatmeal Muffins, Microwave Oatmeal, or Overnight Oats.

The Best Easy Make Ahead Healthy Breakfast
- Eat it all week! Make it on Sunday and eat it for breakfast and snacks all week! My kids love it in their school lunches. You can even freeze individual squares.
- Customize it! Add fruit, chocolate chips, nuts, or seeds. Make something your home will love.
- Minimal prep: This whole recipe can be thrown together in 5 minutes with ingredients you probably already have! No complicated steps or specialty ingredients.
Ingredients and Easy Swaps
Here’s everything you need to make this tasty baked oatmeal.
- Rolled oats: Old-fashioned rolled oats are the key to getting a delicious hearty texture. Do not swap in another type of oats.
- Bananas: To add natural sweetness and moisture, mashed bananas are the perfect option. If you don’t like bananas, you can swap in applesauce, mashed butternut squash, or canned pumpkin. Just note that you may need extra sweetener.
- Unsweetened applesauce: This adds another level of moisture and natural sweetness.
- Milk: Any type of milk will work in this recipe including nut milk and dairy milk.
- Eggs: This binds everything together and adds a little protein. Flax eggs and chia eggs will also work. To boost the protein in this recipe, use high-protein milk, add hemp seeds, or top it with yogurt.
- Cinnamon and vanilla extract: These warm flavors really make this baked oatmeal taste like a delicious baked good. Pumpkin pie spice, apple pie spice, nutmeg, or ginger can be used as well.
- Brown sugar: Brown sugar is a classic ingredient in Amish baked oatmeal, but you can swap in honey or pure maple syrup.
- Baking powder and salt: This helps the baked oatmeal to rise. It can be skipped, but the end product will be denser.
Can this be made with another type of oats? For best results, always use old-fashioned, rolled oats for this recipe. Steel-cut oats won’t cook through and stay hard. Instant oats and quick-cooking oats will get mushy.
If you need a gluten-free recipe, make sure the rolled oats are gluten-free and processed in a wheat-free facility.
Change it Up! Recipe Ideas
This baked oatmeal recipe is basically a blueprint and can be customized in so many different ways. Here are some fun additions and variations of this oatmeal recipe.
- Dried fruit: Add raisins, cranberries, blueberries, dates, apricots, or shredded coconut.
- Fresh fruit: Diced apples, blueberries, raspberries, strawberries, and pears are all delicious in baked oats.
- Nuts: Add some crunch with toasted almonds, walnuts, or pecans,
- Seeds: Make this more nutritious with chia seeds, hemp seeds, flaxseeds, or pumpkin seeds.
- Protein powder: Add extra protein to make this oatmeal more filling. A plain or vanilla-flavored protein powder works best.
- Chocolate: Add some sweetness and fun with chocolate chips, dark chocolate chunks, or white chocolate.
- Nut butter: Swirl some nut butter into the batter before baking for extra flavor and healthy fats.
- Love cinnamon rolls? Don't be afraid to drizzle a little icing (or vanilla yogurt!) on top of these baked oats. For something fast, combine 1/2 cup powdered sugar with 2 tbsp milk, and 1/2 teaspoon vanilla extract. Add two tablespoons of room-temperature cream cheese for cream cheese icing.
What about some toppings? Another fun way to add flavor to baked oatmeal is with fun toppings. Add yogurt, nut butter, fresh fruit, whipped cream, milk, honey, maple syrup, or coconut cream to your oatmeal.

Storing and Freezing Baked Oatmeal
This baked oatmeal is great for meal prep and can be made in advance.
- Storing: Since the recipe has dairy and eggs, store the baked oatmeal in the refrigerator for 4-5 days.
- Freezing: Let the oatmeal fully cool before freezing. The whole tray can be frozen or you can freeze individual squares wrapped in plastic wrap.
- Reheating: To reheat multiple portions, preheat the oven to 350 degrees, cover the baking dish with foil, and bake for 17-20 minutes until warmed through. Individual portions can be reheated in the microwave or toaster oven.
- Make-ahead: To make this in advance, bake the recipe and let it cool completely. Store covered in the fridge and reheat the entire recipe with the instructions above. Do not mix the wet ingredients and dry ingredients the night before because the oats will soak up too much liquid.


Follow Us
Were this world an endless plain, and by sailing eastward we could for ever reach new distances