
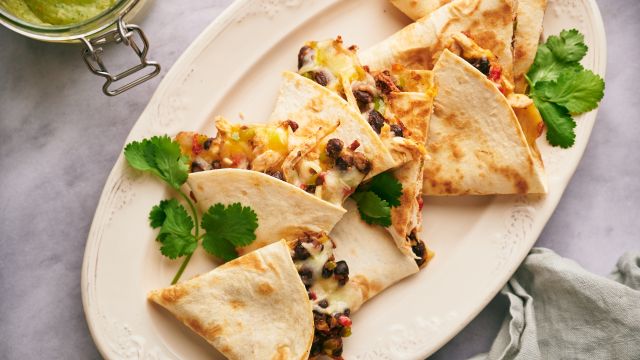
It’s no secret that we love Taco Tuesday around here, but when I want to shake things up I love making these easy Taco Cups.
Fill them with your favorite taco filling, bake them until they are crispy, and add your favorite toppings. This is a meal everyone loves.
Why We Love Taco Cups!
- Fun for parties and game day: These are the perfect appetizer since they are easy to make, budget-friendly, and something different! Trust me, everyone loves these!
- Choose your own filling: Experiment with different fillings including beans, veggies, ground turkey, or ground beef.
- Easy to customize: Set up a taco bar with all the toppings so everyone can personalize their taco cups.
Looking for more taco inspiration? Try these steak tacos, blackened fish tacos, or ground turkey tacos.

Key Ingredients and Easy Swaps
Here is everything you need to make these bite-sized tacos.
- Tortillas or wonton wrappers: This recipe can be made with small corn tortillas, small whole wheat tortillas, low-carb tortillas, or wonton wrappers. There are pros and cons to each, explained below.
- Peppers and onions: To add flavor and nutrients, this recipe starts with a base of peppers and onions that are sauteed in olive oil. Any color pepper and onion will work.
- Black beans: For a plant-based option, black beans are a perfect addition to these taco cups. Pinto beans or white beans would also work.
- Corn: Use canned corn, fresh corn, or frozen corn to add some sweetness and texture to the taco filling.
- Tomatoes: Use fresh Roma tomatoes, cherry tomatoes, or a can of diced, drained tomatoes. For some extra spice, use Rotel tomatoes or any tomatoes with diced green chilies.
- Taco seasoning: Make your own taco seasoning or use a store-bought option. This adds a ton of flavor with just one ingredient. Swap in the individual spices as well - chili powder, paprika, garlic powder, onion powder, cumin, salt, and pepper.
- Shredded Cheese: Monterey jack or cheddar cheese are the most commonly used for tacos. Swap in any cheese.
- Toppings: Get creative with all your favorite toppings including shredded lettuce, cilantro, sour cream or Greek yogurt, avocado, guacamole, and salsa.
How to Make Taco Cups with Ground Beef or Turkey
The most common change that people make to these taco cups is adding ground beef or ground turkey. You can either swap in ground meat for the beans or use both.
- All meat: Swap in 1 pound of lean ground beef or ground turkey for the black beans. Add to the peppers and onions once softened. Brown until no longer pink and then add the taco seasoning and corn.
- Beans and meat: Use ½ pound of ground meat and ¾ cup of beans. Add the ground turkey or beef to the peppers and onions. Brown until no longer pink and then add the beans, corn, and taco seasoning.
- Shredded chicken: If you have leftover shredded chicken, this recipe is also great for using it up! Just swap in 1.5 cups of shredded chicken for the beans.

Wontons vs. Tortillas
There are two main ways that taco cups are made - with wonton wrappers or tortillas.
Honestly, I love them both ways but opted to share the tortilla version since it is something I always have on hand. Wonton wrappers require a special trip to the store.
With that said, I want to share how to make them with wonton wrappers so you can choose. The benefit of using wonton wrappers is that they are thinner and a bit easier to shape into a true “cup” shape. They also get crispier on the edges than the tortillas BUT the bottom and inside layers are softer than tortillas.
Making taco cups with wonton wrappers: Start by spraying the muffin tin well. Press a wonton wrapper in the bottom and then add a spoonful of taco filling and some cheese. Press another wonton wrapper into the cup and repeat, adding more taco filling and cheese.
Tips for using tortillas for taco cups: Always microwave tortillas in a moist paper towel so they don’t break as you press them into the muffin tin. Be gentle as you press them in. Small street-style corn or flour tortillas work best. For larger tortillas, cut them into smaller pieces first.
Taco Cup Toppings
Like any good tacos, one of the best things about this recipe is all the tasty toppings. Here are some of our favorites:
- Shredded lettuce or cabbage
- Cilantro
- Sliced or pickled jalapenos
- Salsa - red salsa, green salsa, or ranchero sauce
- Jalapeno ranch dressing
- Avocado, guacamole, or creamy avocado dressing
- Pickled red onions
- Queso fresco
- Sour cream or plain Greek yogurt
- Healthy queso
- Corn salsa


Follow Us
Were this world an endless plain, and by sailing eastward we could for ever reach new distances