When it comes to baking pies, the most daunting part of the process is making the perfect flaky crust. After all, you want a great foundation to hold all those delicious fillings. But once you master the technique for how to make pie crust from scratch, you can whip up flaky homemade crusts that everyone will be talking about.
where you’ll find our best tips and top-rated recipes. Then, share your bakes in our Bakeable Facebook group. We’d love to see ’em.
How to Make Pie Crust
This top-rated butter pie pastry recipe is a favorite among readers and our Test Kitchen cooks. It makes a single crust, so double the recipe when making double-crust pies.
Ingredients
- 1-1/4 cups all-purpose flour
- 1/4 teaspoon salt
- 1/2 cup cold butter, cubed
- 3 to 4 tablespoons ice water
Looking at this recipe, you’ll notice that it only calls for butter. Shortening, lard and butter are all used in crusts, but our tests have proved that butter makes the flakiest and tastiest crust. (Here’s the best butter brands, according to our Test Kitchen.)
Directions
Step 1: Cut the butter into the flour
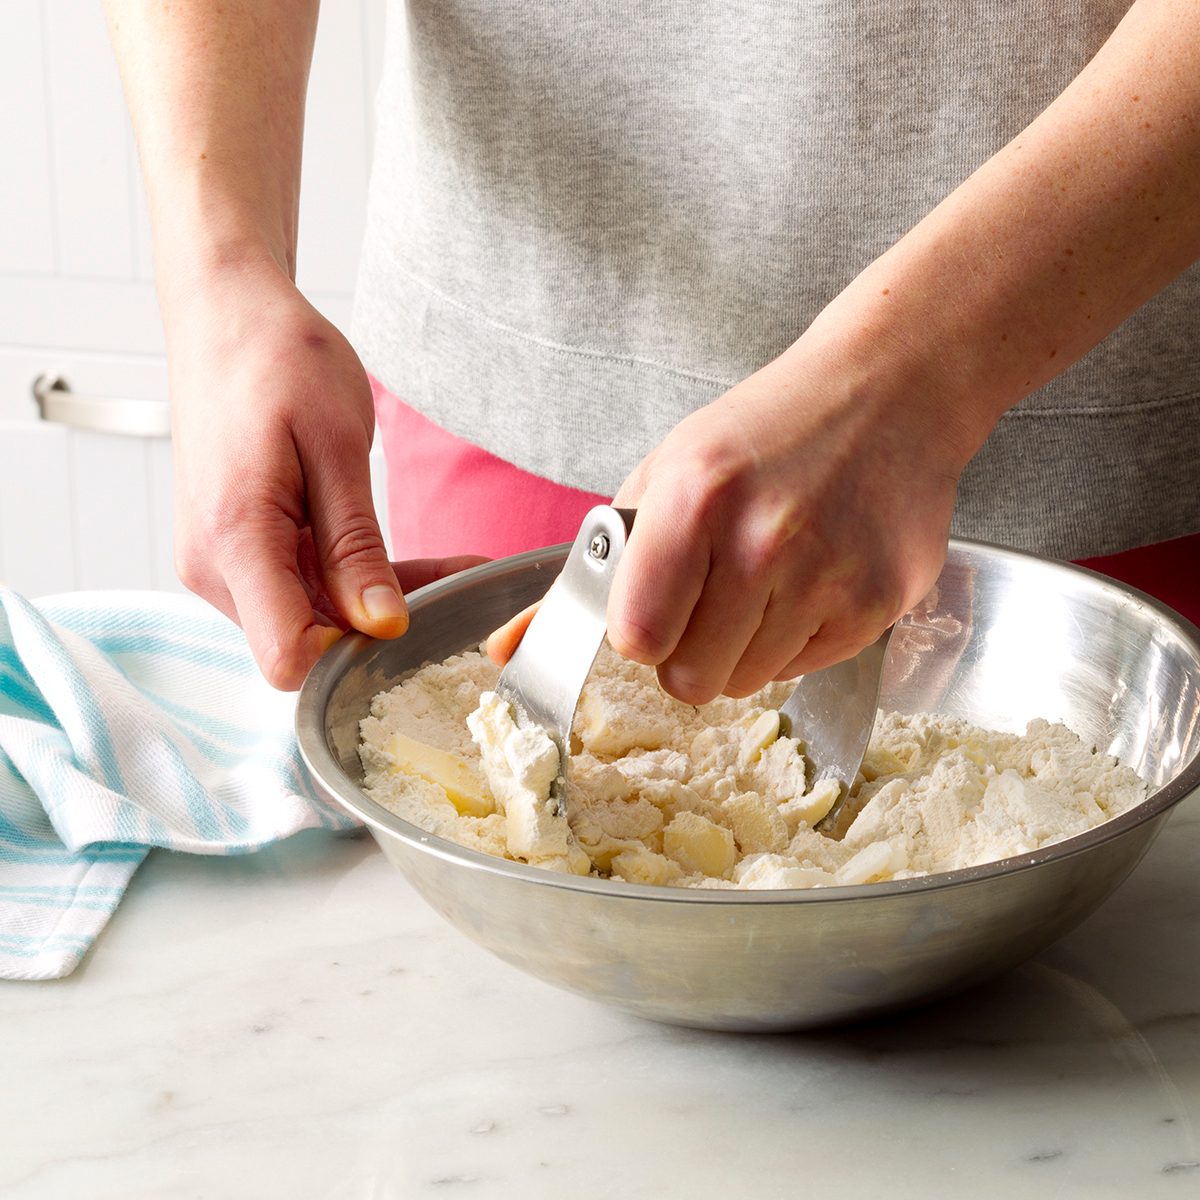
The first step in making pie crust is to quickly whisk together the salt and flour in a large mixing bowl. Then, use a pastry blender to cut cold butter into the flour. Work the butter into the dough until the bits are about pea-sized.
“Always start with cold butter,” says Taste of Home Executive Culinary Director Sarah Farmer. “That way, the heat of the oven will melt it, creating pockets of steam. The steam then gives lift to the pastry, resulting in flaky layers.”
Editor’s tip: Avoid using your fingers to mix—your hands are warm and will melt the butter!
Step 2: Add water
Next, add ice-cold water to your pastry mix. Start slow with just 2 or 3 tablespoons and add more as needed. Your crust is at the right consistency when it holds together when pressed.
“A gentle hand is needed to create flaky layers,” Farmer says. “Using a fork, toss (don’t press) cold butter and water into the flour just until everything is mixed and thoroughly coated.”
Test Kitchen tip: Avoid overmixing the pie crust dough—handling the dough too much will create a tough crust.
Step 3: Chill the pie pastry

Before doing anything else with your pastry, let it chill in the fridge for at least an hour to help firm up the butter. We’ll say it a thousand times if we have to: Cold butter equals flaky crusts.
To chill, form the pastry dough into a disk and cover it tightly with plastic wrap or waxed paper. You can stash it in the fridge for a few days or even freeze it if you’re working in advance.
Test Kitchen tip: If you’re freezing the dough, wrap it tightly in waxed paper and freeze it in an airtight container for up to several weeks. When you’re ready to use it, let it thaw in the refrigerator overnight.
Step 4: Roll the pie crust

After allowing your pie crust to chill, it’s time to get rolling. Lightly dust your work surface and rolling pin with flour to prevent the dough from sticking. As for the best rolling pin to use, it’s all personal preference. If you have a stainless steel or marble pin, pop it in the fridge or freezer in advance—this will keep the pastry dough cool.
To roll, work from the center and move outward to the edges. To help ensure an even shape, give the dough a quarter turn after each roll. Roll until you reach the appropriate size and thickness. If necessary, add an extra sprinkling of flour to prevent sticking as you go.
“If the pastry rips when it’s rolled out, dip a finger into cold water and patch with a bit of extra dough,” Farmer says.
Test Kitchen tip: Most pie crust recipes call for dough that’s 1/8-in. thick—about the same thickness as two quarters stacked on top of each other.
Step 5: Move the crust to your pie pan
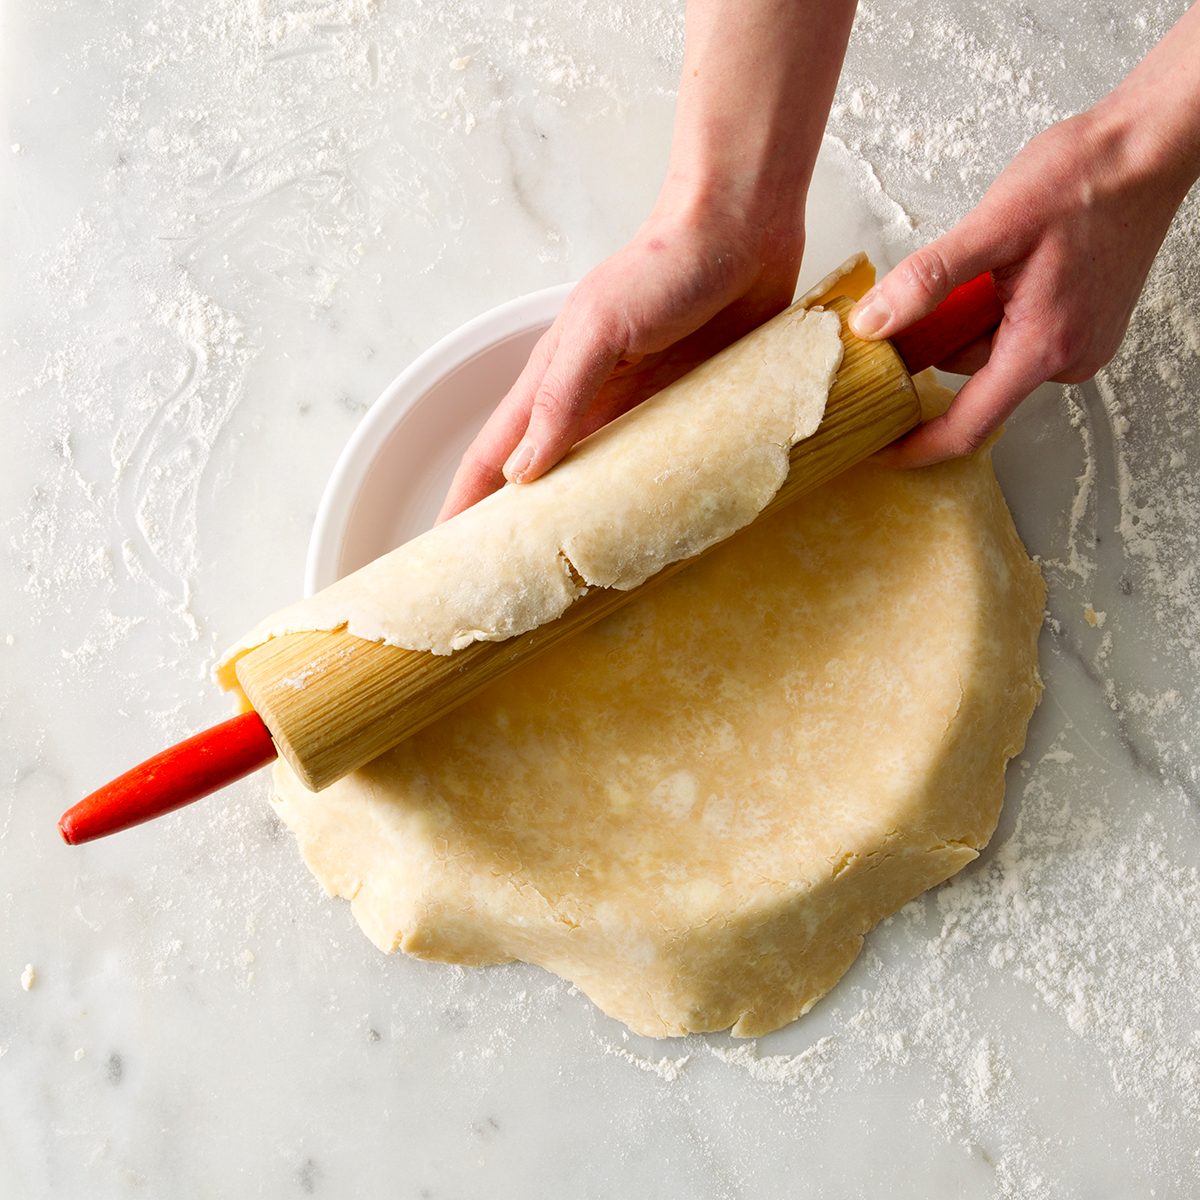
The most stressful part of pie baking is moving your perfectly rolled crust into the pie pan—it can make even experienced bakers tremble. But if you work quickly and confidently, you’ll be just fine (and remember that you can always patch or re-roll the dough if needed).
To move the crust into the pan, rely on your rolling pin. Drape the crust over the pin and quickly move it to your pan. Allow the pastry to ease into the plate and let it settle before you manipulate it. Trim the edges, leaving some excess to crimp.
If you’re making a single-crust pie, all that’s left is to finish the edges. If you’re creating a double-crust pie, it’s time to fill the pie and work on rolling out the second crust. You’ll use the same rolling pin drape method to transfer that crust to cover the top of your pie.
Editor’s tip: If you’re making a double-crust pie, don’t forget to add some vents to allow steam to escape. This can be as simple as adding slashes, but you can also do it by creating a decorative topper like a lattice crust.
Step 6: Finish the edges

You can finish off your pie crust in a variety of ways. Pinching the pastry around the edges is the most traditional method, but you can make decorative pie crusts with all sorts of nifty edges, like ropes or braids. You can also just make pretty impressions using a fork.
For a fluted crust, position your index finger on the edge of the pie facing outward. Then place your other thumb and index finger on the outside edge and pinch the crust around your finger to form a V. Continue around the entire edge of the pie crust.
After all that, it’s time to bake your pie. Just remember to place it on the center rack and keep an eye on it as it bakes to prevent over-browning.
Editor’s tip: Making a pie crust shield is a handy trick that can help prevent a burnt crust.
Sarah Farmer, Taste of Home Executive Culinary Director, contributed to this article.

Dar's Coconut Cream Pie
When I whip up a toasted coconut cream pie, my family goes wild and the pie vanishes. —Darlene Bartos, Shoreview, Minnesota
Lemony Sweet Potato Pie
For a finger-licking finale to any holiday meal, I turn to this light and luscious sweet potato pie laced with just a hint of lemon. Funny how folks always seem able to find room for this delectable dessert! —Peggy West, Georgetown, Delaware
Old-Fashioned Peanut Butter Pie
My mother made a chewy, gooey peanut butter pie I loved as a child. Now I continue the tradition for the next generation of peanut butter lovers. —Brianna DeBlake, Fremont, Michigan
Irresistible Coconut Cream Pie
My husband and I grow 500 acres of wheat on the farm his family homesteaded in 1889. I grind my own flour and love to use it in this recipe. The easy, pat-in crust has a rich grain flavor. It’s irresistible filled with old-fashioned coconut cream and topped with a fluffy meringue. —Roberta Foster, Kingfisher, Oklahoma
Deep-Dish Apple Pie
This recipe is a winner! The crust is so flaky and the filling is sure to please everyone. —Salem Cross Inn, West Brookfield, Massachusetts
Easy Confetti Pie
Sugar cone crust makes a pie that tastes like birthday cake when you add a colorful, creamy no-bake confetti filling. —Gina Nistico, Taste of Home Food Editor
Banana Cream Pie
Made from our farm-fresh dairy products, this pie was a sensational creamy treat any time Mom served it. Her recipe is a real treasure, and I've never found one that tastes better! —Bernice Morris, Marshfield, Missouri
Sour Cream Peach Pecan Pie
Fresh peaches, good southern pecans and real vanilla make this pie a special summertime treat. —Sherrell Dikes, Holiday Island, Arkansas
County Fair Cherry Pie
This cherry pie is so easy! I'm a teacher and a Navy wife, so simplicity and quickness are both mealtime musts at our house. —Claudia Youmans, Virginia Beach, Virginia Bake success right into your pies with these essential pie baking tools
Peanut Butter Cream Pie
During the warm months, it's nice to have a fluffy, no-bake dessert that's a snap to make. Packed with peanut flavor, this pie gets gobbled up even after a big meal! —Jesse & Anne Foust, Bluefield, West Virginia
Easy Fresh Strawberry Pie
For my mother's birthday, I made this strawberry pie recipe instead of a cake. Since it was mid-May in Oklahoma, the berries were absolutely perfect. It was a memorable occasion for the whole family. —Josh Carter, Birmingham, Alabama
Cape Cod Blueberry Pie
We Northeasterners have been baking this pie since the 18th century. Settlers would’ve used little wild blueberries and topped it with cream. I do, too. —Nancy O'Connell, Biddeford, Maine
Ginger-Streusel Pumpkin Pie
I love to bake and have spent a lot of time making goodies for my family and friends. The streusel topping gives this pie a special touch your family will love. —Sonia Parvu, Sherrill, New York
Citrus Cranberry Pie
To showcase abundant fall cranberries, make this beautiful lattice-topped pie. A dollop of orange cream complements the slightly tart flavor. —Taste of Home Test Kitchen New to baking pies? Check out our complete pie baking guide for all the tips and tricks you need for a perfect pie!
Marshmallow-Almond Key Lime Pie
Summer is peak season for Key limes, a must for this pie’s distinctive sweet-tart flavor. Unlike other Key lime pies, mine has a smooth marshmallow top layer that makes it stand out as a dessert crowd favorite. —Judy Castranova, New Bern, North Carolina
Frosty Peanut Butter Pie
With only a handful of ingredients, this peanut butter pie promises to deliver well-deserved compliments. Whenever I bring this creamy, make-ahead pie to get-togethers, I'm asked for the recipe. —Christi Gillentine, Tulsa, Oklahoma
Strawberry/Rhubarb Crumb Pie
Everyone seems to have a rhubarb patch here in Maine. This pie won first prize at our church fair; I hope it's a winner at your house, too! —Paula Phillips, East Winthrop, Maine
Pecan Pie Bars
These pecan pie bars are rich and delicious - just like pecan pie! They're perfect for taking to potlucks and other gatherings...I always come home with an empty pan. This Kentucky Derby dessert is perfect for the races. —Carolyn Custer, Clifton Park, New York
Apple Crumble Pie
The crumb topping of this apple crumb pie recipe is awesome, which may explain why dessert always disappears fast. Or maybe it's the chunky apple filling. Either way, it's a family tradition. —Vera Brouwer, Maurice, Iowa
Juicy Peach & Strawberry Crumb Pie
You've had peach pie and strawberry pie, and maybe even peach-strawberry pie. But throw in some garden-fresh basil and you're in for a real treat. Try it. —Lindsay Sprunk, Noblesville, Indiana
Chocolate Raspberry Pie
After tasting this pie at my sister-in-law's house, I had to have the recipe. I love the chocolate and raspberry layers separated by a dreamy cream layer. It's a joy to serve this standout treat! —Ruth Bartel, Morris, Manitoba
Sugar Cream Pie
I absolutely love Indiana sugar cream pie; especially the one that my grandma made for me. Here, we serve it warm or chilled and call it "Hoosier" sugar cream pie. —Laura Kipper, Westfield, Indiana
Rhubarb Cheese Pie
This tangy rhubarb pie is topped with a luscious cream cheese layer. —Stacey Meyer, Plymouth, Wisconsin
Spiced Plum Pie
The subtle tastes of orange and nutmeg bring out the fresh flavor of plums in this comforting pie. Be sure to have a slice while it's still warm, with a scoop of vanilla ice cream. —Lucille Mead, Ilion, New York
Contest-Winning German Chocolate Pie
Thanksgiving dinner at our house includes an average of 25 guests and a dozen different pies. This one has all the luscious flavor of German chocolate cake. A friend who tried it told me he wanted it to be his birthday pie from now on.—Debbie Clay, Farmington, New Mexico
Chocolate Cheesecake Pie
Guests always go for this rich but simple pie. I like topping it with fresh raspberries or cherry pie filling. —Sandy Schwartz, Brooklyn, NY
Tart Cherry Lattice Pie
Whenever my mom is invited to a party or potluck, everyone requests her homemade double-crust fruit pies. In the summer, she uses fresh tart cherries for this recipe. I love a slice topped with vanilla ice cream. —Pamela Eaton, Monclova, Ohio
Perfect Rhubarb Pie
Nothing hides the tangy rhubarb in this lovely pie, which has just the right balance of sweet and tart. Serving this dessert is a nice way to celebrate the end of winter! — Ellen Benninger, Greenville, Pennsylvania
Sugar and Spice Pear Pie
My family loves pear pie because it's a little less tart than apple pie. The nutty crust complements the tender fruit and buttery pastry. —Kristina Pontier, Hillsboro, Oregon
Sweet Potato Coconut Pie with Marshmallow Meringue
My grandmother's sweet potato casserole contains coconut and marshmallows. I thought it would be even better as a pie. —Simone Bazos, Baltimore, Maryland
Raspberry Pie Squares
Making pie for a crowd may seem impossible, but not when you turn to this crowd-pleasing recipe! The sweet-tart raspberry filling pairs well with a flaky homemade pastry. —Taste of Home Test Kitchen
Lemon Chess Pie with Berry Sauce
This is one of those old-fashioned Southern desserts that makes everyone feel good. The easy-as-pie berry sauce gives it color and a tantalizing tang. —April Heaton, Branson, Missouri
Chocolate Silk Pie
This creamy, quick chocolate pie not only melts in your mouth, it also melts any and all resistance to dessert! What an easy way to say "I love you" on Valentine's Day. —Mary E. Relyea, Canastota, New York
Frozen Grasshopper Pie
When I first started experimenting with cream pies, this seemed like the right recipe to create for a house of chocolate lovers. I guessed right. This is more of an adult New Year's Eve pie, but some have made it for Christmas dessert—served after the kids have gone to bed! —Lorraine Caland, Shuniah, Ontario
Candy Apple Pie
This is the only apple pie my husband will eat, but that's all right since he makes it as often as I do. Like a combination of apple and pecan pie, it's a sweet treat that usually tops off our holiday meals from New Year's all the way through to Christmas! -Cindy Kleweno, Burlington, Colorado
Red, White and Blue Berry Pie
To me, this colorful pie is the epitome of summer. Bright blueberries and raspberries sandwich a cream cheese layer in the pie that’s quite festive. I can’t imagine a holiday party without this tasty treat! —Cindy Zarnstorff, Anchorage, Alaska
Creamy Banana Pecan Pie
You'll get many compliments when you serve this layered banana beauty. It's a snap to prepare because the filling starts with instant pudding mix. —Isabel Fowler, Anchorage, Alaska
Grits Pie
Simple, southern and scrumptious, this pie will be a definite hit even with people who dislike grits. It has the perfect custardy texture.—Victoria Hudson, Pickens, South Carolina
Maple Sugar Pumpkin Pie
We make our own maple syrup, and that's what gives this pie its special taste. You might want to bake this for your Thanksgiving meal. —Martha Boudah, Essex Center, Vermont
Fluffy Key Lime Pie
For a taste of paradise, try this no-bake pie. It's low in fat, sugar and fuss. It truly is the best Key lime pie recipe ever! —Frances VanFossan, Warren, Michigan
Mocha Java Pie with Kahlua Cream
I'm a big coffee drinker and love the iced and frozen versions, too. This pie was my way of incorporating those flavors into a dessert. —Becky McClaflin, Blanchard, Oklahoma
Florida Citrus Meringue Pie
Why limit a fantastic dessert to just one kind of citrus fruit? Thanks to orange and lemon, this lovely pie packs a bold sweet-tart flavor! —Barbara Carlucci, Orange Park, Florida
Double-Crust Strawberry Pie
The first time I made this pie it was delectable, so I wanted to share it. Fresh strawberries sprinkled with cinnamon make a delicious pie served warm or slightly chilled. —Patricia Kutchins, Lake Zurich, Illinois
Silky Chocolate Pie
Chocolate makes the world go round! We have a family that loves chocolate pies, and this version with a splash of brandy is smooth as silk and oh, so special. —Kathy Hewitt, Cranston, Rhode Island
Toffee Ice Cream Pie
“This is my sister’s recipe, but I modified it to save time in the kitchen. No doubt about it, you’ll want a second serving.” Janell Greisen - San Dimas, California
Rhu-berry Pie
I cook in a coffee shop, so I'm always looking for new and unique pies to serve my customers. The combination of blueberries and rhubarb in this recipe caught my eye and it was an instant best-seller. —Karen Dougherty, Freeport, Illinois
Easy Crunch Berry Pie
This is a fresh, simple approach to making a company-worthy pie. The playful Cap’n Crunch cereal crust is fun to bite into, and it’s the perfect complement to a mixed berry no-bake filling. —Taste of Home Test Kitchen
Apple Pie
I remember coming home sullen one day because we'd lost a softball game. Grandma, in her wisdom, suggested, "Maybe a slice of my homemade apple pie will make you feel better." One bite, and Grandma was right. If you want to learn how to make homemade apple pie filling, this is really the only recipe you need. —Maggie Greene, Granite Falls, Washington
Honey Pecan Pie
Looking for a sweet ending to a special meal? This attractive pecan pie is bound to please with its traditional filling and honey-glazed pecans. —Cathy Hudak, Wadsworth, Ohio
Cranberry-Almond Apple Pie
My grandmother made this treat every year for Christmas. It’s much better than everyday apple pie. The recipe is a family treasure. —Maxine Theriauit, Nashua, New HampshireThe post How to Make the Perfect Flaky Pie Crust appeared first on Taste of Home.
Lisa Kaminski