This is it! Your step-by-step guide to the juiciest, crispiest, most golden bird Thanksgiving’s ever seen. Our Taste of Home Test Kitchen has tested, retested and tested this technique again to ensure your bird is nothing but holiday perfection. We’ve laid out a timeline with all the steps you need to learn how to cook a turkey in the oven—and provided expert tips along the way.
Best Turkey Cooking Methods
Roast turkey is delicious, but that’s not your only option. Here are some of our favorite alternative ways to cook a turkey.
- Deep-fried turkey: Probably the most popular cooking method next to roasting, deep-fried turkey is crisp, juicy and so much fun to make.
- Smoked turkey: Rich, tender and slightly sweet, a smoked turkey is one of the most delicious ways to cook a turkey. Smoking is largely hands-off, too, so you can focus on your other dinner dishes while it cooks.
- Grilled turkey: If you’re not ready to give up the chargrilled flavor of summer barbecue, try grilling your Thanksgiving turkey. Hello, grill marks!
- Slow-cooked turkey: Best for those hosting Thanksgiving for the first time, a slow-cooked turkey is so easy to make. Plus, you can use the drippings to make homemade gravy.
- Instant Pot turkey: Need turkey ASAP? Cooking turkey breast, legs and/or thighs in the Instant Pot can get your main dish on the table in an hour or less.
- Air Fryer turkey: For those who don’t have the space or equipment to deep fry a turkey but still want that crispy skin, air-frying turkey breast, legs and/or thighs is a great solution.
Psst! Not Thanksgiving yet? This basic timeline works for any turkey-roasting day.
The Week Before Thanksgiving
Buy a Turkey
For the sake of convenience, we recommend starting with a frozen turkey. Plan to head to the store at least five days before you roast. The earlier you shop, the better your choices will be. This guide will walk you through the different types of turkey you can buy.
When choosing a frozen turkey, size matters. A typical 14-pound bird serves 16 people. Want to assure yourself of those valuable leftovers? Add an extra pound or two. Here are more turkey buying tips that’ll help you choose the right bird for you.
Test Kitchen tip: This is a smart time to start gathering ingredients for stuffing, cranberry sauce and green bean casserole. Check out our best traditional Thanksgiving recipes, here.
Thaw the Turkey
Don’t forget to thaw! Every 4 pounds of frozen turkey will need 24 hours of thawing time. For a 14-pound bird, plan on pulling the turkey from the freezer five days before the big feast. Move it to the fridge for safe thawing. Take a look at our step-by-step instructions for how to defrost a turkey the right way.
Test Kitchen tip: Set a calendar alert on your phone immediately after buying the turkey to remind you when you need to thaw.
Craft Your Secret Weapon

Set yourself up for success with this brilliant tip. While the turkey is still in its packaging, devise an oven shield out of aluminum foil. (This will help protect the bird from overbrowning when it comes time to roast!) Mold a few sheets of foil around the breast area, then set aside in a safe place until roasting day. Check out these other turkey tips from our Test Kitchen.
The Day Before Thanksgiving
How to Prepare a Turkey
Peel the bird from its packaging and remove all of the giblets (those meaty pieces) from inside the turkey. They tend to hide out deep inside the bird. Next, remove and toss any large pockets of fat along the neck. And by the way, here’s why you should not wash your turkey before cooking it.
Now the fun starts: Give your bird the rubdown with an ample amount of salt (preferably kosher). Massage it all over the outside of the turkey. This is the secret to getting that extra-crispy skin we all crave on the holidays. Return the bird to the fridge when you’ve finished.
Test Kitchen tip: Save the neck when removing the giblets. It’s the key to making some seriously good gravy.
How do I make my turkey moist?
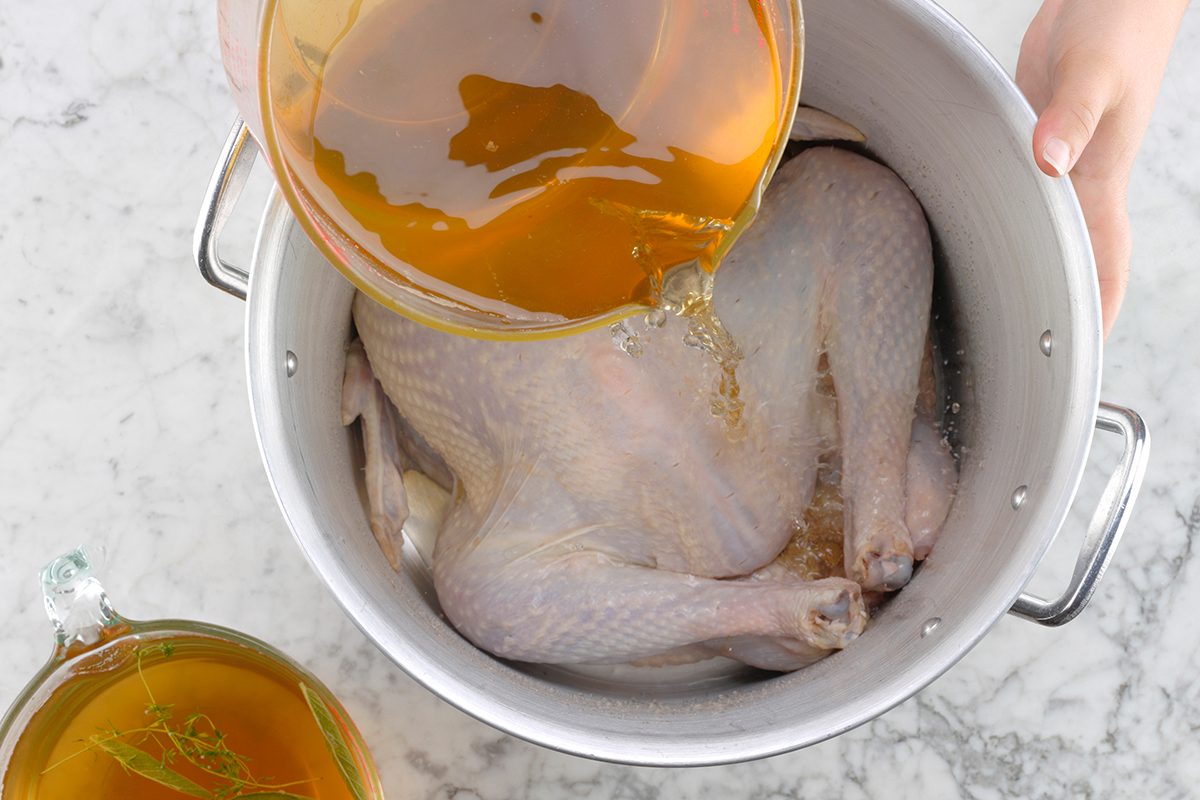
There are many tips for roasting a moist turkey, but one of our favorite methods is brining. This process involves soaking the turkey in a water, salt and herb solution overnight to infuse the bird with moisture and flavor. Here’s how to brine a turkey the right way, if you want to try it out.
Another way to add moisture to a turkey is by stuffing it with aromatics like apples, citrus, vegetables and herbs, rather than stuffing. As the turkey roasts, the aromatics will breakdown and boost the bird’s moisture.
Allowing the turkey to rest after it has been roasted is also a good tip. This allows the juices to redistribute in the turkey and prevent them from running out when carved.
Thanksgiving Day
At last, the big day has arrived! Plan on starting the turkey at least four hours before you sit down for dinner, or earlier depending on the size of your bird. Follow this guide to learn the best way to cook a turkey. (Want to kick it up a notch? Try these flavorful turkey recipes.)
How to Cook a Turkey in the Oven
You’ll need:
- Whole turkey
- Turkey neck and roughly chopped onion, celery and carrots (optional)
Tools:


- Sharp knives: Whether it’s to trim the turkey before it’s roasted or carve it up for dinner, a trusty sharp knife or two is a must.
- Meat thermometer: This probe thermometer will alert you exactly when your turkey comes up to temperature. It’s much more reliable than the pop-up timers that come with turkeys.
- Roasting pan: This sturdy roasting pan and grill is on the shallow end to prevent your delicious turkey drippings from burning off.
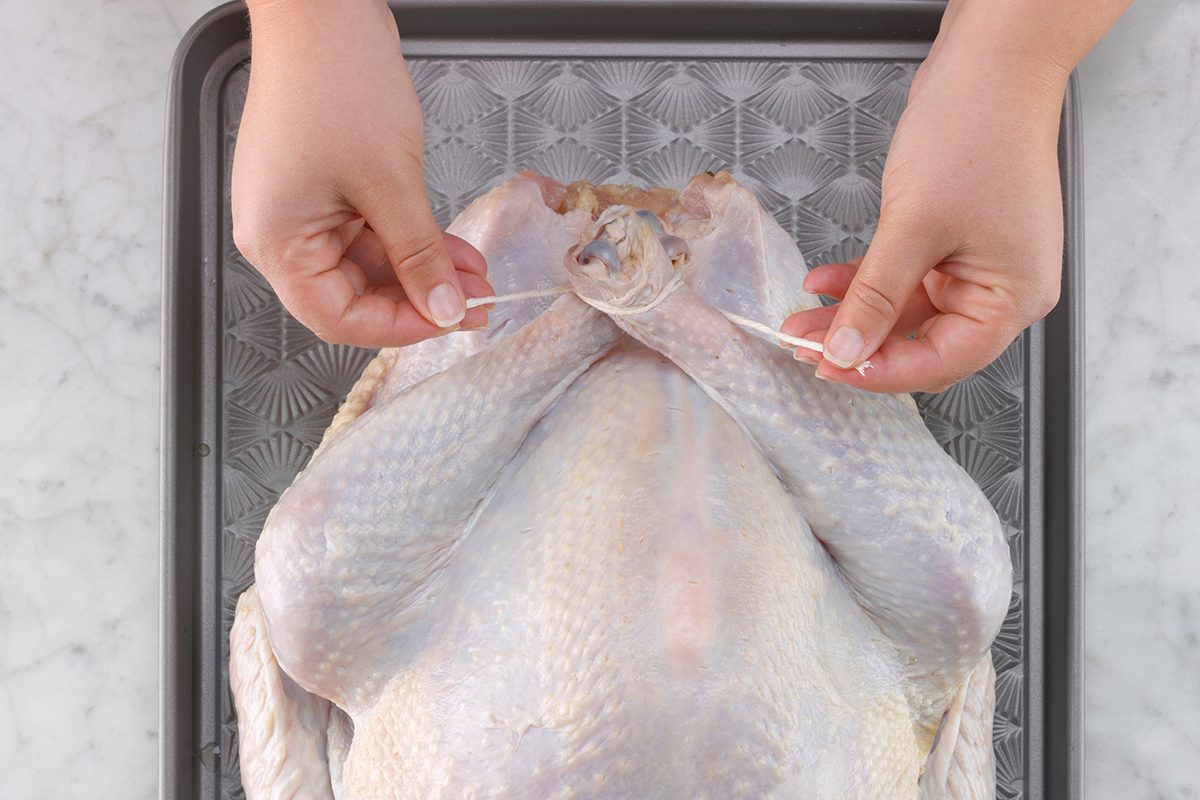
- Toothpicks: Your basic toothpick will help keep the turkey’s skin from shrinking and exposing the meat.
Here are some more turkey tools you might find handy this Thanksgiving.
Step 1: Bring out the Turkey
Remove the turkey from the fridge and let it sit at room temperature for about 30 minutes. The turkey will cook more evenly by warming up a bit.
Test Kitchen tip: This is the perfect time to preheat the oven to 425°F.
Step 2: Set up the Pan
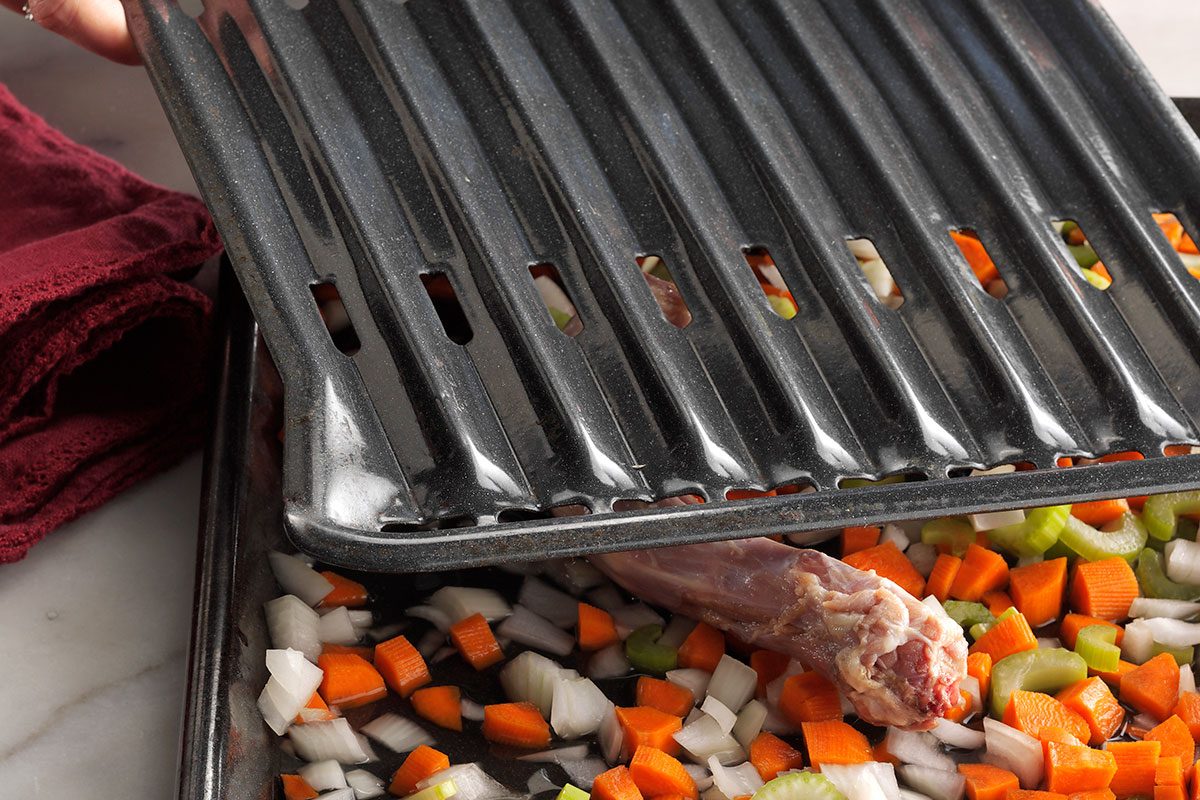
The best homemade gravy comes from tasty pan drippings. For this to happen, you’ll want to add veggies like roughly chopped onion, celery and carrots to the bottom of the pan along with the turkey neck and gizzards. Cover with the perforated rack or grill grate. The veggies will help flavor the drippings as well as help protect them from evaporating away in the oven.
Test Kitchen Tip: If you don’t have a standard roasting pan, feel free to use a broiler pan. The cooking turkey will be exposed to the heat just as well as a proper roasting pan.
Step 3: Season the Turkey
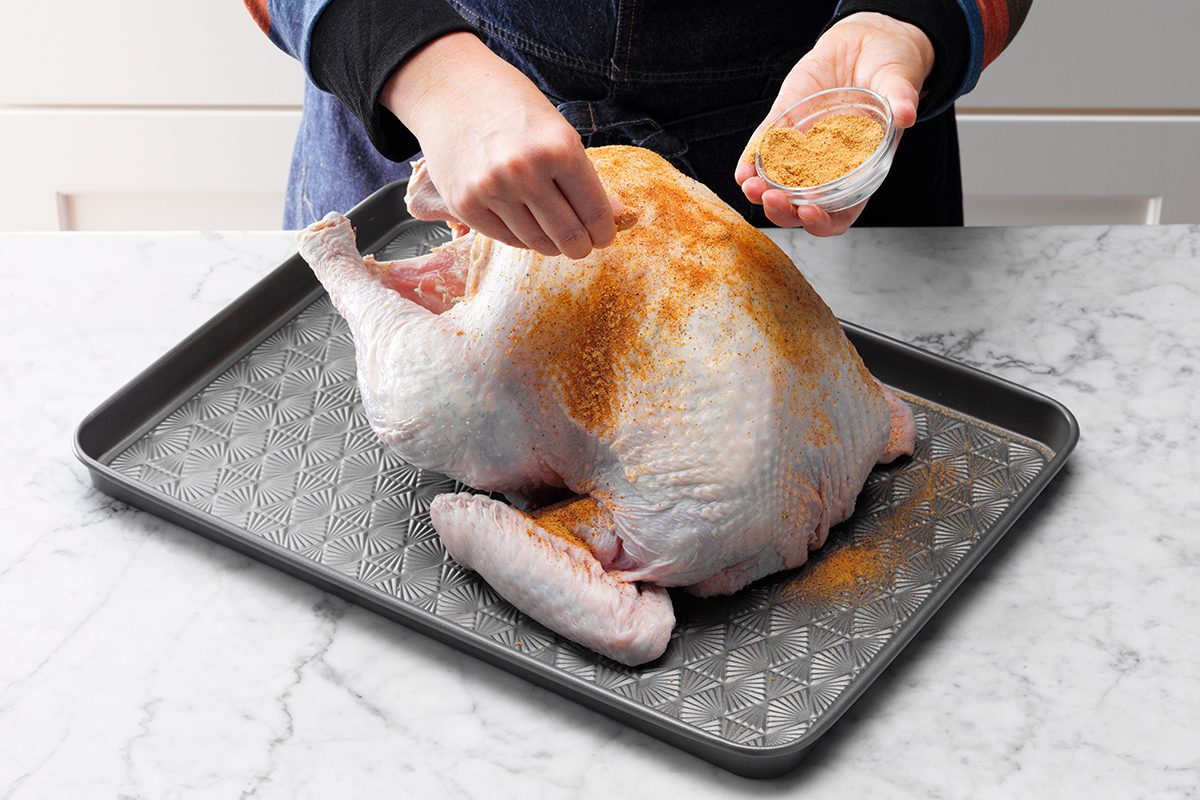
Pat the turkey dry with paper towels and then rub with a little more salt and your favorite seasonings. (We love the mix listed in this Roasted Sage Turkey recipe.) If you have fresh herbs, add a handful to the cavity, along with some wine or water. It helps keep the turkey moist and also flavors the drippings, making great-tasting gravy later. Here are some more ideas for how to season a turkey.
Test Kitchen Tip: Instead of using paper towels, try this surprising trick for crispy turkey skin.
Can I season my turkey the night before?
Yes, you can season a turkey the night before you roast it. In fact, adding the seasonings the night before can actually help the flavors infuse more deeply into the bird.
Step 4: Secure the Skin
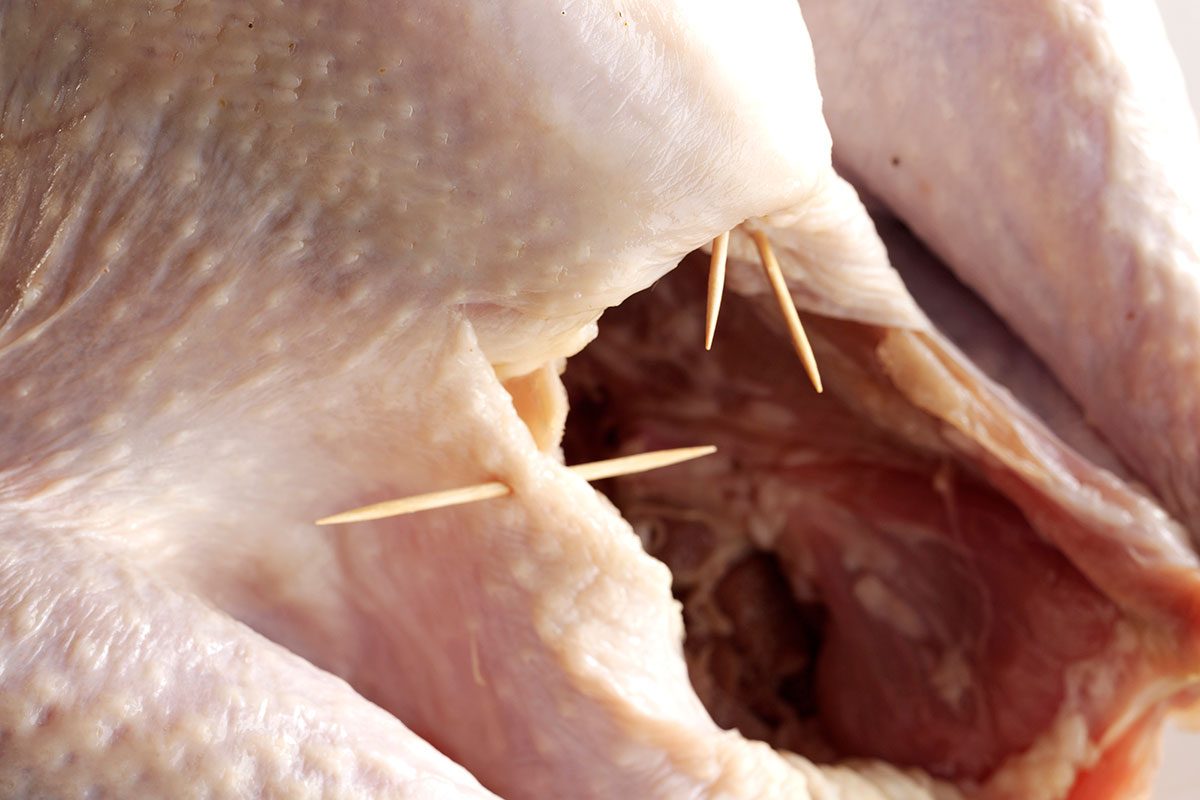
Our food stylists’ best-kept secret: Use toothpicks to secure the skin to the inside of the bird near the legs. This step helps make the bird look extra-glamorous when it has finished cooking.
Step 5: Oil It Up
For the last touches, rub the skin with oil. (Yep, we prefer to use oil instead of butter!) Canola, vegetable or olive oil all work well. This helps give the bird crispier skin and an allover golden brown glow.
Step 6: Get Roasting
At last! Grab your oven mitts, because it’s time to cook a turkey. Check out our roasting chart below for approximate cooking times.
We’ve found it best to start by roasting turkey at a high temperature (425°F) to help speed up the cooking time. (This also helps to make the legs and thighs extra crispy!) About 40 minutes in, reduce the oven temperature to 325-350°F for the remainder of the roasting time.
Test Kitchen tip: Slide the turkey into the oven legs first. The reason? Oven temps are often warmer near the back. This way, the thighs will get the higher heat they need, while the breast cooks in the lower heat by the door. Also, try to resist the urge to peek inside the oven while the turkey’s roasting. Opening the door cools the oven, adding extra cooking time.
How long do you cook a turkey for?
Not sure how long to bake a turkey? The roasting times provided in this chart are for defrosted poultry that is refrigerator cold.
We don’t recommend stuffing the turkey, but if you insist on doing so, add 15 to 45 minutes to the roasting time. The temperature of the stuffing must read at least 165°.

But what about basting?
We know Grandma lovingly basted her turkeys over and over, saying it would keep the meat juicy. However, the opposite is true. Each time you open the door while baking a turkey, you’re cooling the oven as well as the outside of the bird. This means the turkey will take longer to cook. More time in the oven causes the meat to dry out and the skin to become soggy instead of crispy.
Step 7: Check the Temperature and Remove
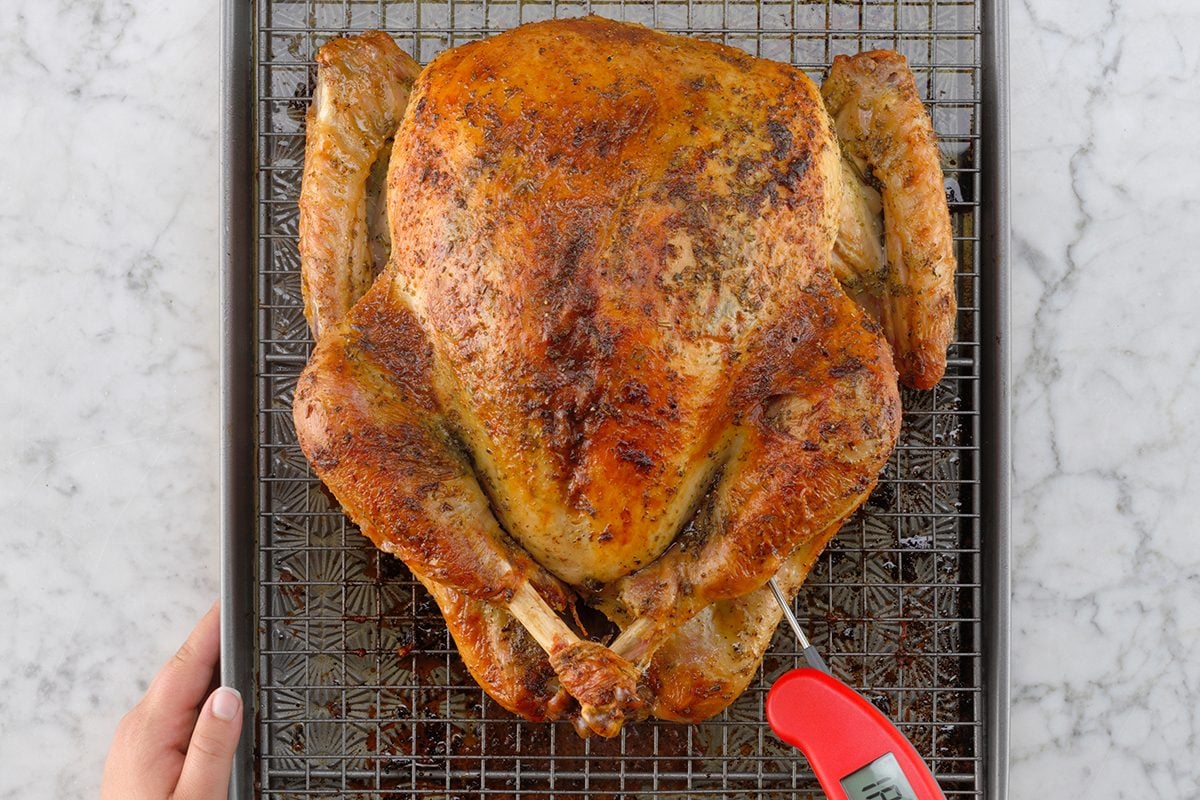
When you feel confident that the bird is close to finished, check its temperature using an instant-read thermometer (we use this thermometer and timer combo from ThermoWorks). Insert the pin of the thermometer into the thickest part of the thigh, being careful not to come into contact with the bone (this will throw off the reading!).
Remove the turkey from the oven when the internal temperature is 5 degrees below the desired doneness. Don’t worry, it’ll still be safe to eat. Turkeys continue to cook even after being removed from the oven in a process known as carryover cooking. By removing the bird early, you’re actually ensuring that it doesn’t overcook or dry out.
Step 8: Let It Rest
After you take the turkey out of the oven, let it stand for 20 to 30 minutes before carving.
Test Kitchen tip: We’ve found that you don’t need to cover it with foil during standing as many recipes tell you to do. This traps steam between the foil and the skin, causing it to get soggy. We promise it will stay warm.
Step 9: Make Turkey Gravy
While the turkey is resting, turn those turkey drippings into a flavorful homemade gravy. To do so, pour the drippings into a 2-cup measuring glass and skim off the fat. Add enough broth to the remaining drippings to fill the measuring glass to the 2 cup mark. Transfer the dripping and broth to a small saucepan and bring to a boil.
In a small bowl, whisk together 1/4 cup of flour and 1/2 cup of milk together until smooth and then slowly whisk the slurry into the drippings. Season the gravy with 1 teaspoon of chicken bouillon granules, 1/4 teaspoon of poultry seasoning and a dash of white pepper. Bring the gravy back to a boil and cook, stirring constantly, for 2 minutes or until thickened.
Step 10: Carve the Turkey
One of the most important parts of cooking a turkey is knowing how to carve a turkey the right way. Not only does proper carving make your turkey pieces look the best they can, it helps prevent the turkey from getting tough and chewy. Watch the video above or look at this guide to learn how to carve a turkey.
Step 11: Enjoy!
There’s only one thing left to do—dig in! This crispy, golden brown wonder will steal the show and delight friends and family. Give yourself a pat on the back and enjoy the spoils.
In the days after Thanksgiving, repurpose any leftovers into these delicious leftover turkey recipes, including soups, sandwiches, casseroles and much more. Need a break from Thanksgiving flavors? No worries, just make sure you know how long leftovers are good for.

Herb-Glazed Turkey
Honey and corn syrup blend with savory herbs and seasonings to give this turkey a slightly sweet flavor. My tried-and-true recipe never fails to win me compliments. —Charlene Melenka, Vegreville, Alberta
Grilled Huli Huli Turkey Drumsticks
I'm never one to do things traditionally, so when it came time to hosting Thanksgiving, I went in a completely tropical direction. Borrowing my favorite Hawaiian chicken recipe, I substituted turkey legs and have never looked back. —Jacyn Siebert, San Francisco, California
Pressure Cooker Italian Turkey Breast
This recipe makes some of the most succulent turkey I've ever eaten. High in lean protein, it’s a smart entree for a special occasion. —Jessica Kunz, Springfield, Illinois
Apple-Sage Roasted Turkey
A hint of apple flavor gives a slightly sweet spin to a holiday dinner’s main event. The lovely aroma wafting from your kitchen as this turkey cooks will have everybody talking. —Suzy Horvath, Milwaukie, Oregon
Turkey Lattice Pie
With its pretty lattice crust, this cheesy baked dish looks as good as it tastes. It's easy to make, too, since it uses ready-to-go crescent roll dough. —Lorraine Naig, Emmetsburg, Iowa
Herbed Roast Turkey Breast
When learning how to cook turkey breast for my first formal dinner party as a newlywed, I came across this particular recipe. It was such a success that this turkey breast recipe has become a standby on all my entertaining menus. —Lisa Mahon Fluegeman, Cincinnati, Ohio
Romano Basil Turkey Breast
Guests will be impressed when you slice this golden, grilled turkey breast, dressed up with a flavorful layer of basil and cheese under the skin. —Darlene Markham, Rochester, New York
Mediterranean Turkey Potpies
Your clan will love these wonderful, stick-to-the-ribs potpies with a Mediterranean twist. I always use the leftovers from our big holiday turkey to prepare this recipe. I think my family enjoys the potpies more than the original feast! —Marie Rizzio, Interlochen, Michigan
Pressure-Cooker Herbed Turkey Breasts
Tender turkey breast is enhanced with an array of flavorful herbs in this juicy, comforting dish. —Laurie Mace, Los Osos, California
Turkey Breast Tenderloins with Raspberry Sauce
Sweet and tangy raspberry sauce is a perfect complement to versatile turkey tenderloins. In fact, the sauce is so good, you’ll be tempted to eat it with a spoon.—Deirdre Cox, Kansas City, Missouri
Slow-Cooked Turkey with Herbed Stuffing
I'm all for turkey dinner, especially around the holidays. A whole turkey won't fit in my slow cooker, so thank goodness for turkey breast. I cook it with my grandma's easy stuffing recipe for a happy meal that doesn't require any hard work. —Camille Beckstrand, Layton, Utah
Turkey Bundles
This recipe is definitely a must-try, and all you do is bundle up creamy turkey filling in crescent dough. I usually double the recipe so I have extra for lunch the next day. —Lydia Garrod, Tacoma, Washington
Butter & Herb Turkey
My kids love a turkey meal, and this one falls off the bone. It's the ideal recipe for special family times and holidays. —Rochelle Popovic, South Bend, Indiana
Peppery Herbed Turkey Tenderloin
I won the North Carolina Turkey Cook-Off one year with these full-flavored tenderloins in rich sauce. Marinating the turkey in wine, garlic, rosemary and thyme gives it a fantastic taste. —Virginia Anthony, Jacksonville, Florida
Roasted Sage Turkey with Vegetable Gravy
There’s no prep like home-style when roasting the big bird. Instead of sage stuffing with turkey, fill this bird with fresh sage and thyme sprigs for the same delicious flavors. —Beth Jacobson, Milwaukee, Wisconsin
Spatchcocked Herb-Roasted Turkey
This moist and tender turkey cooks up with even browning and crispy skin in half the time of a whole turkey. —Matthew Hass, Ellison Bay, Wisconsin
Pressure-Cooker Turkey with Berry Compote
This delicious dish gives you a way to get all that yummy turkey flavor without heating up the house, and the berries make the perfect summer sauce. For a browner turkey, just broil it for a few minutes before serving. —Margaret Bracher, Robertsdale, Alabama
Turkey Cutlets with Pan Gravy
Using cutlets or any boneless meat speeds up cooking time for this quick entree. You can use thin boneless, skinless chicken breast as well. —Margaret Wilson, Sun City, California
Creole Roasted Turkey with Holy Trinity Stuffing
I jazz up turkey Creole style with the trinity of onions, bell peppers and celery—plus a stuffing that gets hotter and hotter the longer it sits. —Eric Olsson, Macomb, Michigan
Turkey Biscuit Stew
This chunky stew makes a hearty supper, especially in the fall and winter. It'salso a great way to use extra turkey during the holidays. —Lori Schlecht, Wimbledon, North Dakota
Thanksgiving Stuffed Turkey
I've tried fancy stuffing recipes for our holiday bird, but none hits the spot like my mother's simple mixture of bread, eggs and caramelized vegetables. Have it on any holiday. —Lily Julow, Lawrenceville, Georgia
Maple-Sage Brined Turkey
When the leaves start turning, it’s turkey time at our house. We use maple-sage brine to help brown the bird and make the meat incredibly juicy. —Kim Forni, Laconia, New Hampshire
Slow-Cooked Herbed Turkey
When herbs are plentiful in my garden, I prepare this turkey recipe. The turkey stays moist in the slow cooker and is bursting with herb flavors. When I served this to our Bible study potluck group, everyone wanted the recipe! —Sue Jurack, Mequon, Wisconsin
Turkey Cordon Bleu Casserole
Impress your holiday visitors with this fancier twist on the traditional casserole. —Kristine Blauert, Wabasha, Minnesota
Rosemary Turkey Breast
I season turkey with a blend of rosemary, garlic and paprika. Because I rub half of the mixture directly on the meat under the skin, I can remove the skin before serving and not lose any of the flavor. The result is an entree that’s lower in fat, yet delicious—the perfect centerpiece for holiday meals. —Dorothy Pritchett, Wills Point, Texas
Happy Orange Turkey
Here’s the perfect centerpiece for your Thanksgiving feast. Champagne and oranges flavor this special bird that will become one of your favorite turkey recipes ever. —Tara Baier, Menomonie, Wisconsin
Golden Apricot-Glazed Turkey Breast
Basted with a simple glaze, this wonderfully moist and tender turkey bakes to a lovely golden brown. Make it the centerpiece of your holiday table; guests will be glad you did. —Greg Fontenot, The Woodlands, Texas
Turkey & Spinach Stuffing Casserole
I know dried cranberries may seem like an odd ingredient to include in this dish, but they add just a hint of sweetness that makes an easy casserole so special. —Gilda Lester, Millsboro, Delaware
Thyme Roasted Turkey
It's easy for flavors to get lost when using too many seasonings together. When in doubt, a simple combination of butter and fresh thyme captures the essence of Thanksgiving for a classic turkey dinner. —Alma Winberry, Great Falls, Montana
Make-Ahead Turkey and Gravy
Ease the holiday time crunch with a make-ahead turkey recipe that's ready to serve when you are. It's a great choice for potlucks, too. —Marie Parker, Milwaukee, Wisconsin
Stuffed Turkey with Mojo Sauce
I love Latin food so I created this recipe that combines wonderful spices and fresh ingredients. This is a traditional turkey recipe with a healthier twist because it uses chicken sausage instead of chorizo. —Melissa Lauer, San Antonio, Texas
Turkey Dumpling Stew
My mom made this stew when I was young, and it was always a hit. Since it's not time-consuming to make I can fix it on a weekend for our children, who love the tender dumplings. —Becky Mohr, Appleton, Wisconsin
Marinated Thanksgiving Turkey
My family enjoys this Thanksgiving turkey because it cooks up tender, tasty and golden brown. Build up flavor by marinating the meat, then grill it to add a tempting barbecued flavor. —Ken Churches, Kailua-Kona, Hawaii
Moist & Tender Turkey Breast
This easy turkey recipe is sure to be popular in your home. Everyone will love the taste, and you'll love how quickly it comes together. —Heidi Vawdrey, Riverton, Utah
Roasted Turkey with Maple Cranberry Glaze
I prepare turkey with a taste of Canada in mind. The sweet maple flavor comes through even in the breast meat. You may start to notice it's caramelized color after about 2 hours. That's when I cover it loosely with foil while it finishes cooking. The meat will stay tender and juicy. —Suzanne Anctil, West Vancouver, British Columbia
Minestrone with Turkey
I remember my mom making this soup; now I make it for my kids as often as I can. It's a good way to use up leftover vegetables. Sometimes I add a can of rinsed and drained kidney or garbanzo beans. —Angela Goodman, Kaneohe, Hawaii
Turkey in a Pot
I use this recipe often as an easy Sunday dinner idea. The turkey breast gets a "holiday treatment" when served with cranberry gravy seasoned with cinnamon, cloves and allspice. —Lois Woodward, Okeechobee, Florida
Fruit-Glazed Roast Turkey
Apple, cranberry and raspberry flavors blend with fresh herbs in a tangy glaze for the roasted turkey. It's a welcome change to a traditional entree. —Aysha Schurman, Ammon, Idaho
Slow-Cooker Turkey Breast with Gravy
This quick-prep recipe lets you feast on turkey at any time of year. We save the rich broth for gravy, noodles and soup making. —Joyce Hough, Annapolis, Maryland
Turkey-Stuffed Acorn Squash
We stuff acorn squash with leftovers like turkey, dressing and cranberry sauce. Make as much or as little as you need to use everything up. —Cindy Romberg, Mississauga, Ontario
Citrus & Herb Roasted Turkey Breast
This recipe will make you love turkey again. Brining with lemon, rosemary and orange juice makes it so moist and flavorful. It's the star attraction at our table. —Fay Moreland, Wichita Falls, Texas
Thanksgiving Stuffed Shells
Leftover turkey, dressing and sweet potatoes make terrific stuffing for jumbo pasta shells. We add cheese and use turkey gravy as the sauce for this crowd-pleaser. —Robin Haas, Cranston, Rhode Island
Honey-Citrus Glazed Turkey
A turkey breast is enough for us, but you can roast a whole bird if you're feeding a big group. Either way, this super-succulent turkey wins the day. —Peter Halferty, Corpus Christi, Texas
Spiced & Grilled Turkey
My fiance loves to grill, so for the holidays we decided to grill our turkey instead of deep frying it. It was the best we'd ever tasted! Having the brine in the pan under the turkey catches the drippings, but also keeps everything nice and moist. Start with the breast down, then flip to the other side. —Sydney Botelho, Columbia, South Carolina
Creamy Turkey Casserole
I sometimes make turkey just so I have the extras for the casserole! —Mary Jo O'Brien, Hastings, MinnesotaThe post Your Step-by-Step Guide for How to Cook a Turkey appeared first on Taste of Home.
James Schend, Caroline Stanko