What’s old is new again. We’re all plunging into grandma’s recipe box for a delicious dessert, asking mom for help with a classic Sunday chicken dinner and even thinking about some old-fashioned dishes we miss seeing on the table—particularly Jell-O molds. There’s something about these wiggly, jiggly fruit-filled molds. They’re sweet, refreshing and—when they come out right—pretty to look at.
Now, don’t think that making Jell-O molds is something only Mom or Grandma could master. It’s just gelatin after all! We’ll show you how to make a basic two-layer mold filled with fruit and finished with a creamy layer—perfect for a side dish or light dessert.
How to Make a Jell-O Mold

To make this strawberry Jell-O mold—one that’s sure to please—we’re taking tips from reader Gloria Grant of Illinois who says this recipe has been in regular rotation for years. To make it you need just a few ingredients:
- 1 package (6 ounces) strawberry gelatin
- 1-1/2 cups boiling water
- 1 package (10 ounces) frozen, sweetened strawberries, thawed
- 1 can (8 ounces) unsweetened, crushed pineapple
- 1 cup sour cream
- Fresh strawberries to garnish (optional)
Test Kitchen Recommended Products for Making Jell-O Molds


- Tupperware Jel-Ring Mold: New to making molds? This plastic mold from Tupperware is just what you need. It’s easy to remove the gelatin and we love that you can seal it up! Here are a few more Tupperware faves.
- Mesh strainer: You’ll need to sieve out some fruit for this recipe. A mesh strainer will come in handy.
- Glass measuring cup: You can’t go wrong with a Pyrex measuring cup. This heat-safe cup is perfect for measuring out the boiling water in this recipe.
Step 1: Mix Up the Gelatin with the Fruit
In a large bowl, dissolve the package of gelatin in the boiling water. Make sure the powder is completely dissolved. Then add in the pineapple and strawberries—juices included.
Next, grab your strainer and strain the liquid from the fruit. Set aside one cup of the liquid and keep it at room temperature. The rest of the liquid and fruit can be combined together again.
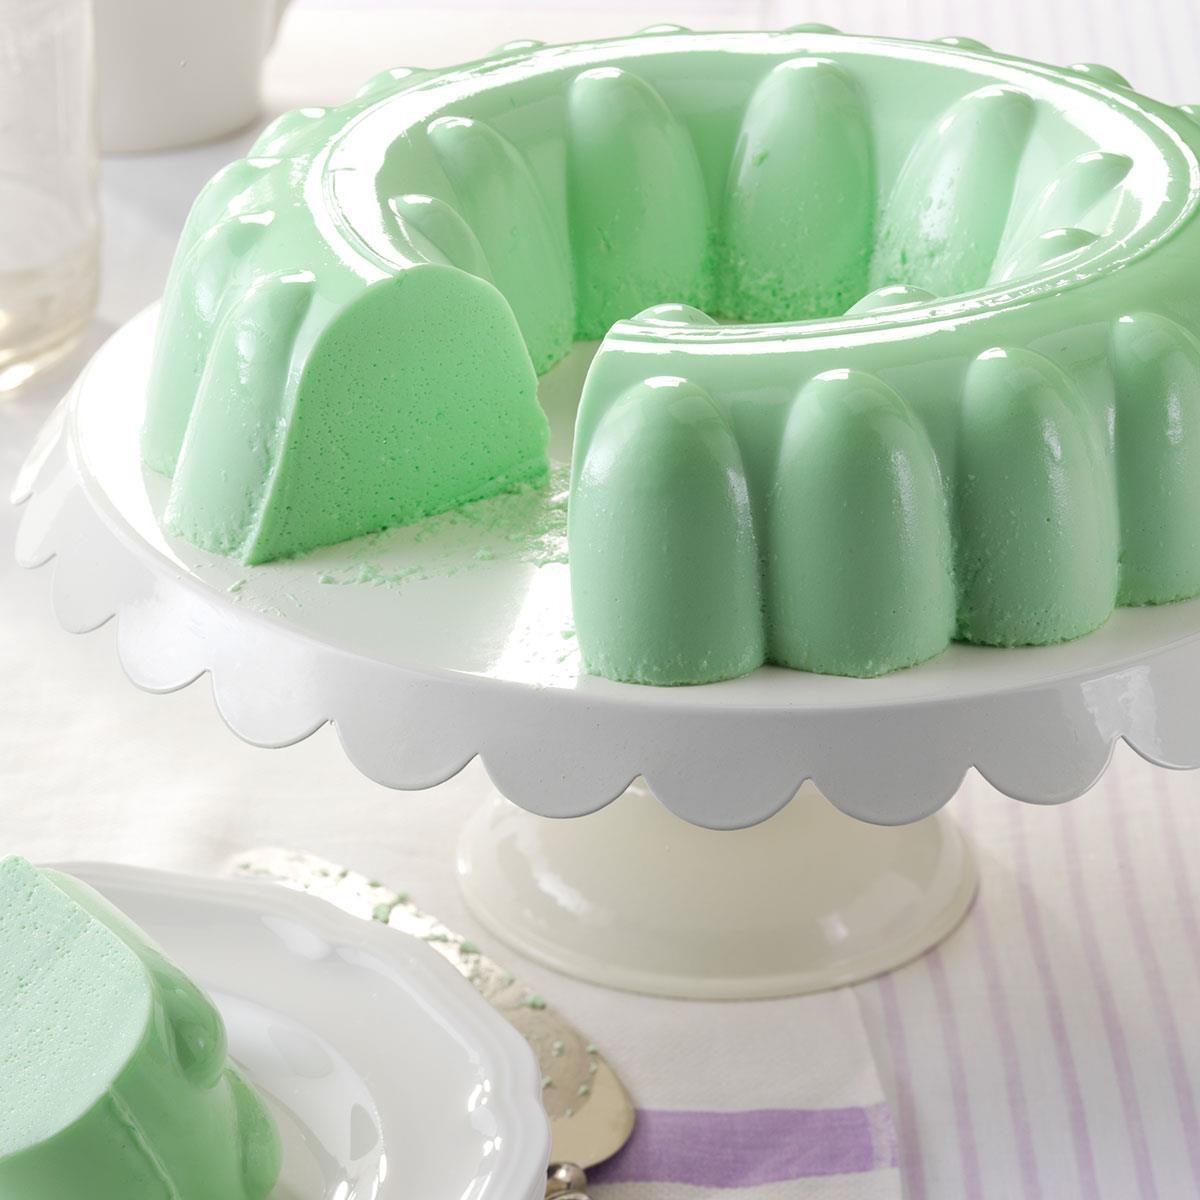
Step 2: Prep the Mold and Add the First Layer
Grab your 5-cup ring mold and give it a good coat of cooking spray. You really want to get into all the nooks and crannies so nothing sticks.
Pour in the fruit and gelatin mixture, cover and refrigerate for 45 to 60 minutes. Don’t let it sit any longer or the second layer will not stick to this base.
Step 3: Make the Second Layer
While the first layer is chilling, make the second creamy layer of this molded treat. To do this, just whisk together that reserved cup of liquid with the sour cream. Don’t be wary of the sour cream! The juice and gelatin will sweeten it up so the only flavor your get is creamy and fruity.
After the first layer has chilled for an hour, pour this pale pink mix over the top. Cover and refrigerate until set—about another hour.
Step 4: Unmold and Serve
When the gelatin is completely set, place a plate over the bottom of the mold and flip. With all the cooking spray, the mold should come out easily (just give it a little jiggle).
If you find that the mold isn’t coming out right away, don’t fret! Fill a large pan with hot water and set the mold in the water for about ten seconds. This will loosen up the gelatin and encourage it to release from the mold.
Once the gelatin is unmolded on your tray, you can slice and serve! If you want to get fancy, garnish with fresh fruit and a few mint leaves. If you plan on serving this as a dessert instead of a side, spoon some fresh whipped cream over the top.
Types of Jell-O Molds
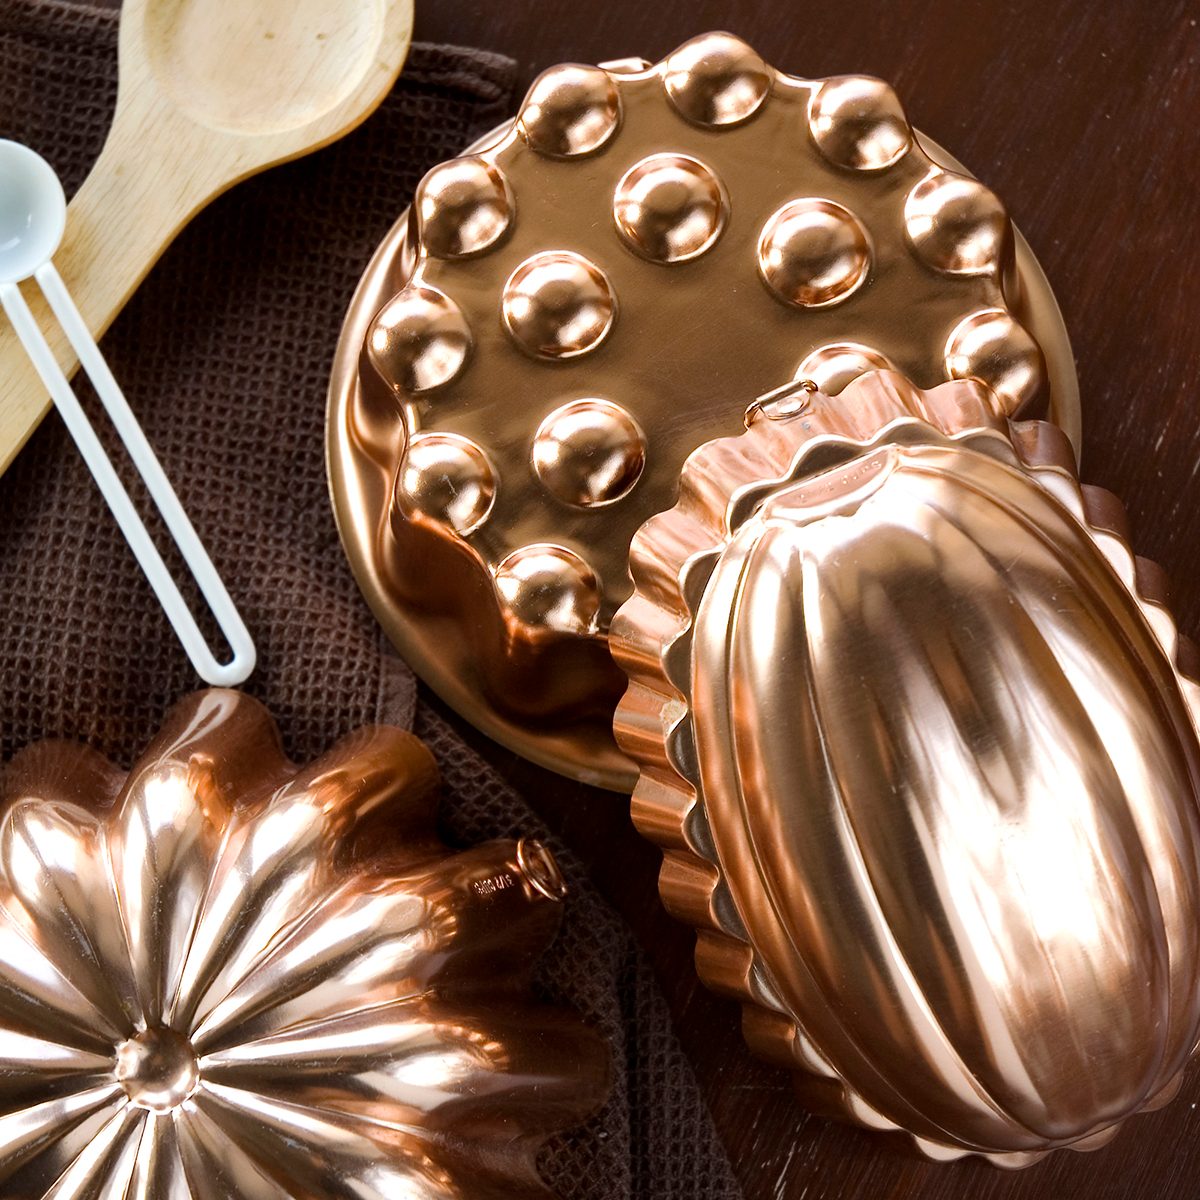
When it comes to Jell-O molds, there are so many options to choose from! Check out the materials and then find the designs that speak to you.
- Copper: Everyone has seen these copper molds before (most likely hanging up in Grandma’s kitchen). But you can absolutely use a copper mold to make a Jell-O salad (and not just decoration). These molds provide a bit more vintage flair to your recipes.
- Plastic: Whether you’re new to making molds or like the convenience of a dishwasher-safe container, plastic molds are a good option. Many of these molds have a removable seal on the top and bottom so you can unmold the gelatin more easily. Plus this extra seal covering the top of the mold is perfect for transporting your mold (or just keeping strong fridge smells out of your recipe).
- Silicone: You can also use silicone molds to make Jell-O salads. Silicone molds come in all sorts of shapes from flowers to seasonal shapes to mini versions of classic mold shapes. If you use a silicone mold, place the mold on a sheet pan or tray while you work and chill just to keep the mold stable.
Jell-O Mold Tips
Whatever recipe you choose and whatever mold you pick, there are a few tricks to bear in mind when creating the perfect Jell-O dessert:
- Spray your mold: Make sure you spray your mold—no matter what type you use—with cooking spray before filling. This will make removing the gelatin easier.
- Take your time: Multi-layer molds take time to create. Each layer needs to set for about 45 minutes before adding the next. Don’t rush the process!
- Keep an eye on the clock: While these molds can take time to create, do keep a timer handy. You need the gelatin to be almost (but not entirely) set before adding the next layer. This nearly set consistency helps the layers stick together.
- Use frozen and canned fruits: Most gelatin salad recipes call for defrosted frozen fruits and canned fruits—and for good reason. These options have a softer texture that works better with gelatin.
- Set Jell-O faster: If you’re in a rush, a Jell-O mold might not be the recipe for you (there’s lots of chilling time required). However, if you want to speed up the process a bit, you can set up a pan of ice-cold water and ice cubes in the fridge. Set your mold into the pan (making sure no water gets in the mold) and let it cool in the fridge.
- Use hot water to remove a stubborn Jell-O mold: If your mold isn’t releasing from the pan, set the mold in a pan of hot water for 10 seconds and try to remove it again. Repeat the process until the gelatin slides out of the pan.
More Jell-O Mold Recipes
This strawberry Jell-O mold is just the tip of the iceberg! These shaped desserts come in all sorts of flavors like lime, raspberry—even sangria.

Molded Strawberry Salad
This refreshing salad has two layers - a pretty pink bottom that includes sour cream, and a ruby red top with strawberries and pineapple. For years, Mom has included this salad in meals she prepares for our family. -Gloria Grant, Sterling, Illinois
Grandmother's Orange Salad
This orange salad dessert is slightly sweet and tangy, too. It adds beautiful color to any meal and appeals to all ages! —Ann Eastman, Santa Monica, California
Molded Cranberry-Orange Salad
When I take this dish to potlucks during the holidays, people always ooh and aah. Feel free to top with whipped cream for added appeal. —Carol Mead, Los Alamos, New Mexico
Peach Bavarian
Fruit molds are my specialty. This one, with its refreshing peach taste, makes a colorful salad or dessert. —Adeline Piscitelli, Sayreville, New Jersey
Sweet & Tart Lemon Jell-O
With its sunny lemon color, this gelatin mold brightens up any table. I usually make two molds for parties because it disappears so quickly. —Patricia Ryzow, Thousand Oaks, California
Best Rosy Rhubarb Salad
During the holidays, I'll at times serve this unusual salad in place of cranberry sauce. It goes well with pork or poultry . Honestly, though, it's good with any everyday meal, too. It's just a little tart, so it rounds out rich food. I've been cooking ever since I made corn bread to surprise my family when I was 9. My brothers wouldn't eat it—but my parents did! My husband and I are dairy farmers in partnership with our grown son.
Pina Colada Molded Salad
My gelatin ring gets a tropical twist from coconut, pineapple and macadamia nuts. It's a wonderful anytime treat. Now that I'm retired from teaching, I have more time for kitchen experiments. —Carol Gillespie, Chambersburg, Pennsylvania
Cran-Raspberry Gelatin Salad
Just like Grandma’s, this pretty gelatin salad has full berry flavor without being too tart. It’s perfect for any holiday dinner. —Rosemary Burch, Phoenix, Arizona
Orange Buttermilk Gelatin Salad Mold
A dear friend shared this recipe with me years ago. Now it's my favorite dish to take to a church meeting, shower or any potluck event—it's always a hit. Whenever I serve this salad, people ask for the recipe. They find it hard to believe it's really made with buttermilk! —Juanita Hutto, Mechanicsville, Virginia
Snowy Raspberry Gelatin Mold
This mold is always on our holiday table. The raspberry layer makes an attractive base for the creamy cream cheese layer. —Lily Julow, Lawrenceville, Georgia
Sangria Gelatin Ring
This gelatin is enjoyed by everyone because you just can't go wrong with fresh berries. —Nicole Nemeth, Komoka, Ontario
Waldorf Orange Cinnamon Holiday Mold
My family prefers this to traditional cranberry gelatin molds. The cinnamon zing really complements ham and turkey. —Nancy Heishman, Las Vegas, Nevada
Simple Lime Gelatin Salad
Looking for a festive dish to light up the buffet? This pretty green gelatin salad is eye-catching and has a delightful, tangy flavor. —Cyndi Fynaardt, Oskaloosa, Iowa
Apricot Gelatin Mold
My mother always made this apricot Jell-O salad for celebrations. When my husband and I were dating, he fell in love with this dish and, as soon as we were married, asked me to get the recipe. You can substitute peach or orange gelatin for a fresh summer treat. —Suzanne Holcomb, St. Johnsville, New York
Cranberry-Eggnog Gelatin Salad
Refreshing and bursting with flavor, this festive jello salad is a great choice for a holiday potluck or make ahead Thanksgiving side. The sweet pineapple-eggnog layer contrasts nicely with the cool and tangy gelatin on top. Since it has to chill overnight, it’s a good pick for those dishes you want to prepare a day ahead. —Nancy Foust, Stoneboro, Pennsylvania
Fluffy Cranberry Mousse
This is a delicious and pretty salad for the holidays, but it's so good that I serve it at other times, too. I got the recipe from a neighbor who had served it with a traditional turkey dinner. —Helen Clement, Hemet, California
Rosey Raspberry Salad
Whenever I make this pretty raspberry salad, people talk! It's a festive side dish that works well for celebrations throughout the year. —Jane Vanderground, Macedonia, Ohio
Mango Gelatin Salad
My Aunt Nannette shared this smooth and refreshing salad as a convenient do-ahead dish. The mango and apricot flavors go well with pork, chicken and beef. —Debra Sult, Chandler, Arizona
Molded Cranberry Nut Salad
We try lots of cranberry recipes, and this one is always requested when we have family get-togethers at Thanksgiving and Christmas. It's also been a favorite dish at every church potluck I've taken it to! —Eleanor Arthur, Seattle, WashingtonThe post How to Make a Jell-O Mold That Comes Out Perfect appeared first on Taste of Home.
Lisa Kaminski